
There are several ways to share images
- Sharing partial access to your XVWeb
- Emailing images within XVWeb
- Downloading a screenshot of a series
- Downloading individual images
1. Sharing partial access to your XVWeb
This video shows how to create a temporary account with a set expiration date that will have limited access to your patient database.
Step by Step Guide
One way to send or share images is by using the share feature within XVWeb. This will give the recipient partial access to your XVWeb site depending on your settings
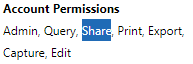
First, you'll need the share privilege to use the share function
Login to your XVWeb and click your username in the top right, then select about and help
if you have the share privilege listed, you will have the share function

Begin by navigating to the patient you'd like to share
next select share on the right side

if the recipient is already a created user within your XVWeb site you can use the option 'User'
if the recipient is not an XVWeb user already, you can select temp user to create them a temporary account
Under share content you can restrict their access to view the entire patient profile, or just the study. Next, create a username for them. After that, type in the recipient's email address
you can check the box for 'Allow user to download images' if you want the recipient to be able to download a copy of the shared images off of your XVWeb. Finally, set the expiration date of their profile and select share

The recipient will receive an email describing that someone from your XVWeb site has shared access to images.
Make sure the recipient checks their spam and junk folders in case the email is filtered out of their inbox
The recipient will follow the instructions in the email to access the images.
If at any time you wish to update the expiration date, or revoke access to their account, an admin privileged user can access the users list to update the recipient's user account. See this article for a walkthrough: Creating Users - XVWeb
2. Emailing Images Within XVWeb
This video shows how XVWeb can email your images for you.
Step by Step Guide
To email directly from your XVWeb first start by logging into your XVWeb site and selecting your username in the top right. From there select about and help. If export is listed as one of the permissions, you will have the ability to email images.


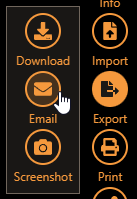
Next navigate to the patient record you are trying to email. On the left hand side, use the select tool to select both studies and/or individual images you wish to share. Click select to activate and deactivate the select tool

If you select an entire thumbnail on the left hand side, that entire series will be emailed. An orange bounding box will indicate the series and images that are selected.
CT images must be emailed individually and cannot be selected as part of a group.
After you have selected the images you wish to email click export on the right hand side and choose email.
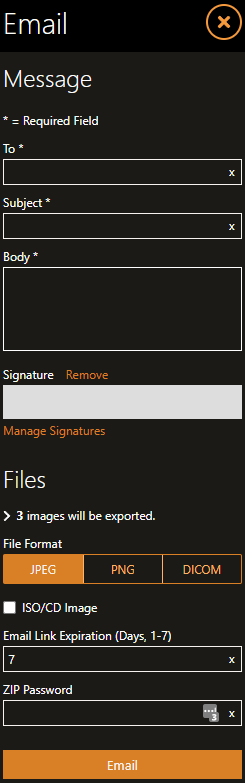
Fill out the recipient's email address in the to box along with the subject and body. Feel free to use the signature area to fill in an existing or a new email signature. Under 'Files' the number of images that will be emailed will be shown. Choose the preferred file format from JPEG PNG or DICOM. Select ISO/CD Image if the recipient wishes to place their received images onto a burned CD. Set the number of days between 1-7 that you wish the email link to expire. Finally set a zip password for the file that the recipient will receive then click email
The recipient will receive an email from your specific XVWeb address. Make sure the recipient checks their spam and junk folders for the email. The recipient can follow the instructions included in the email to view the images.
3. Downloading a Screenshot of a Series
This video shows how to use the built in tools to screenshot a series of images.
Step by Step Guide
To download a copy of images from your XVWeb first start by logging into your XVWeb site then selecting your username in the top right. From there select about and help. If export is listed as one of the permissions, you will have the ability to download and screenshot images.
Next navigate to the patient record you are trying to screenshot. Select the series you wish to view from the left preview bar. Next click export on the right hand side and choose screenshot.

Choose the file format and scale you prefer. Next choose to include the patient name, tooth numbers, or placed labels. Finally choose screenshot. After the image has finished screenshotting it will download to your browsers chosen folder, which is typically downloads.
4. Downloading Individual Images
This video shows how to pick and choose entire series or individual images to download to your computer.
Step by Step Guide
To download a copy of images from your XVWeb first start by logging into your XVWeb site then selecting your username in the top right. From there select about and help
if export is listed as one of the permissions, you will have the ability to download and screenshot images.
Next navigate to the patient record you are trying to screenshot. Select the series you wish to view from the left preview bar.
On the left hand side, use the select tool to select both studies and/or individual images you wish to share.
Click select to activate and deactivate the select tool. An orange bounding box will indicate the series and images that are selected. If you select an entire thumbnail on the left hand side, that entire series will be emailed
After you have selected the images you wish to export click export on the right hand side and export, then download.

After the image has finished screenshotting it will download to your browsers chosen folder, which is typically downloads.
Article Version 1.0 2021.11.30