
This article shows the steps for updating the NameGrabber application being used on the local workstation during/after a server migration of either XrayVision or XVLite (and rebrands).
On every individual computer that uses NameGrabber, perform the following steps:
- Locate NameGrabber in the system tray, right-click the
 icon and choose 'Exit'.
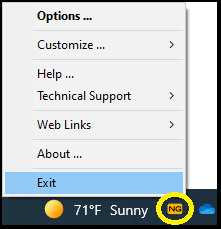
- Delete any desktop shortcuts that exist.
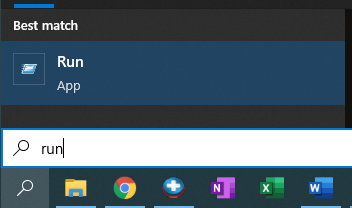
- Open the "Run Dialogue" by holding down the Winkey and pressing "R" or by typing "run" into the Windows search box
- Windows 10 has 2 separate "Startup" folders. Each one can be accessed by typing one of the following into the Run Dialogue:
- Local User Startup Folder - shell:startup
- Local Shared Startup Folder - shell:common startup

- Delete any NameGrabber shortcuts in the file explorer windows.
- At the top of the file explorer window, clear the current folder path and type in the new share path for NameGrabber.
Example "\\newserver\Apteryx\Apteryx Imaging\" - Run the NameGrabber executable as Administrator.
- Select 'Yes' to the startup question.
- (Optional) Right click NameGrabber and choose 'send to' > 'Desktop (Create Shortcut)'.
- The NameGrabber icon may push to the hidden icons. Click the icon and drag the icon into the unhidden icons area.
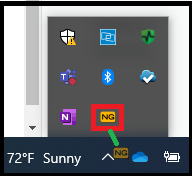
- Right-click on the now active NameGrabber icon within the system tray and select 'options'
- Verify the launched application path matches the new share path for the imaging software being used.
Example "\\newserver\Apteryx\Apteryx Imaging\xvassistant.exe" - (Optional) After the first computer has been setup, we recommend testing the functionality of the program to ensure it is behaving as expected.
- Repeat steps 1-13 for any additional computers.
Article Version 1.1 2022.3.18